

(My favorite handbag.)
I don’t write about handbags much, but like most women, I do have a thing for them. I like to switch out my bag with the seasons, and since it’s warmed up here lately (except for this weird cold front that blew in yesterday), I got out my trusty old ivory bag by Simply Vera Vera Wang for Kohl’s. I bought this bag as my first Mother’s Day present to myself in 2009, when James was about five months old. Back then, it was a big splurge, and even though the purse is faux leather, it was one of the most expensive handbags I’d ever owned. I’ve since purchased pricier bags, including a fabulous diaper bag-slash-it bag combo by Timi & Leslie, but I always come back to this little number eventually.
It’s beginning to look a little worn now, but I still love the soft ivory color and the gorgeous ruching down the front of the bag. It’s plain and simple, the way I like things, and also very light and sturdy. When I had two babies in diapers, I usually carried a larger purse and a diaper bag (I know that sounds crazy but I could never give up my own purse for one that held Desitin). Now that the boys are older, I am out on my own a lot, so I can carry a lighter bag, and when I do need to bring diaper supplies with me, I just put a small bag in the car. Easy as pie!
This is the first time in a while that I’ve dusted off my favorite handbag and brought her out again to enjoy, and it’s sort of like reuniting with an old friend. I don’t get too attached to possessions, and I often give away shoes and bags after a season or two. But this bag is a keeper for sure.
Do you have a favorite purse you just can’t part with? I’d love to hear!
Before the boys were born, we had a glass-top coffee table in our living room. It was passed down from my parents and was fairly old, and once James started crawling, we moved it into the guest room to avoid any possible bumps or bruises. Once we knew Rhys was on his way, we sold the table to prepare for his arrival. Thus, we’ve been without a coffee table for over four years now.
That’s not a bad thing with small children, since the extra floor space gives them plenty of room to play. We also have a small table and two chairs, which are ideal for afternoon snacks, but not much else. I’ve missed having a coffee table, and now that the boys are older, they could use a little space to chuff their trains and color their pictures without having to lie on the floor or sit at the kitchen table.

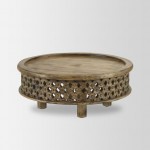
I’ve had my eye on this Carved Wood Coffee Table from West Elm for a while, and I think it would work perfectly in our eclectic living room. But, as Ryan pointed out, those holes in the sides are perfect for inserting food and other small items, and it would be a chore to clean. Plus, it is fairly small and low to the ground, so I can easily envision lots of elbowing and screaming as the boys attempt to share the small space. For now, it’s a pipe dream, but maybe one day I’ll treat myself to that gorgeous little table.

A second option is the incredible Everlasting Play Table from The Land of Nod (don’t you love their creative names?), which comes with three sets of removable legs (stored under the table!) to change the height as your children grow. This idea is pure genius, I think, and I really love the grey color shown here. But, at $400, I’m fairly certain I’d have a hard time accepting the inevitable bumps and scratches that go along with two little boys; so for us, it doesn’t seem like the best investment piece at the moment.
I browsed the table selection at IKEA, and as usual, felt a little disappointed, so that left Craiglist. My goal was to find a table that I liked well enough that also met the boys’ needs. It had to be big enough for James and Rhys to use together. And while a few scratches and dings were allowed, and even encouraged so I don’t get too worked up about more inevitable damage, I didn’t want it to look like a hunk of junk.

(Both boys claimed the table for themselves right away.)
Monday night, I found this sweet table, and it will fit the bill quite nicely, for now. I love its shabby-vintage style, and it fits right in with my eclectic cottage decor. Plus, those pink knobs from Anthropologie had me from the very first sight. Aren’t they sweet?
And maybe one day, once the boys are older and can work in their bedrooms, quietly doing their homework (a mom can dream, right?), then I’ll go ahead and splurge on that West Elm table. Of course, by then, there will be a new design to capture my fancy.

When I hosted my blogger and creative get-together recently, my lovely friend Jen was gracious enough to lead us all in a wonderful craft creating wrapped leather bracelets. She did a phenomenal job, so I asked her to share the steps again here. Let me know if you try this bracelet, and please visit Jen on Pinterest.
I love any and all crafts, so when Catherine asked me to help out with the craft at her meet-up, I jumped at the chance. The first thing I did was head to Pinterest. I’m pretty new to the site and love it (it can be quite addictive, but is ever so handy). I had several doable looking projects I’d been wanting to try in my DIY-Craft board, and decided to give these bracelets a go.
While the original pin had easy-to-follow pictures, I struggled a bit, finding it hard to wrap while taped down and then I was messing up the fit because I couldn’t figure out how much of the leather to wrap. I worried that if I had problems with it, others at the meet-up might, too. As a result, I re-did it a bit. Putting the bracelet together the way I’m about to tell you made sense to me, so I thought I’d share what I did, just in case it helps you out, too.

The first thing you want to do is get all your materials together. You’ll need a pair of scissors, some embroidery floss in your favorite colors, Tacky Glue, leather cording (I chose the “Latigo Lace” over the suede), an embroidery needle, and a sharpie marker.
 Cut a strip of leather. Here’s where you need to think about what you want your final bracelet to look like. For the original pin (less wrapping, more leather), double the length of the bracelet size you want and add two inches. For me, this was 18 inches. If you want to see less leather and more wrapping, add four inches to the doubled length (so for me this would be 20 inches).
Knot both ends. For some, this might be easy to do, but it took me a while to figure it out. If you’re like me, here’s exactly what I did.
Hold the strip of leather about at midpoint in your left hand. Take the right end of the leather strip in your right hand, bring it around to your left hand and tie a knot where you are holding it in your left hand. If you look at it, it should look like a loop with a knot in the middle and a very long tail. Now take the knot into your right hand and pull to slide the tail through your left hand until you get to the end. With your left hand, bring the left end back around the loop (heading towards the first knot) and tie a knot.

Check your fit. If you like the idea of seeing more wrapping and less leather when you wear your bracelet, your knots should be close together–with about half an inch between knots. If want to see more leather (like the original pin), the knots will still be on the bottom of your wrist, but farther apart — about 2 to 2 1/2 inches between them.
If it’s too big, undo one of the knots, cut off a bit, re-knot, and check the fit again. For my first bracelet, the knotting and fitting part took me the longest, so don’t be discouraged if it’s not perfect the first time.

Open up the bracelet to the point where you can just slide it over your hand, and take it off. (If it’s super easy to take off, you opened it too far). Now, take your sharpie and mark the leather from knot to knot. This will serve as a guideline for where you wrap the embroidery floss, so don’t worry about the sharpie ruining your bracelet. You won’t see it in the end.

Next, undo ONE of the knots. Cut a length of your choice of embroidery floss (about 12-18 inches should be fine). Run a thin line of glue at the start of the sharpie mark (where your knot WAS). Run the end of the floss along the glue (tail pointing down) and begin wrapping, using the sharpie mark as your guideline where to start and wrapping down over the tail and glue.

Continue wrapping. When you want to change colors, cut the color you are currently working with, leaving about a 1/4 inch tail. Repeat the process with a new color floss, wrapping over the tails of both the former and new color as you go.

When you have reached the end (of your sharpie guideline), thread the floss you are working with through an embroidery needle. Push the needle back through the wrapping you have done and pull the thread through to secure. Trim the thread flush with the bracelet (you’ll have only the tiniest piece sticking out from the wrapping). Now, re-knot the knot you had undone and repeat on the other side (un-do the other knot and wrap along the sharpie guideline, etc).

Tightly pull the knots to secure. Double check your fit and trim any excess ends from the knots. How long you want the tails is up to you. I cut mine pretty short, but still long enough to tug to tighten, if need be.

And here you go, the finished product! These are the three I made. Here you can see the top two are the original pin’s version (more leather showing) and the bottom one (the purple-y one) shows what it looks like if your knots are close together and you have more wrapping and less leather showing. Which look do you prefer?
(All photographs by Jen Perks. Craft adapted from this post.)